Nice to meet you again MM friends, this time I will give a tutorial on how to combine two textures, namely alpha and rbg into one whole texture and can be used into materials in unity.
The reason I wrote this article was because I once got a free texture on the internet that had two files like the image below.
The image above is an example of a texture that is intentionally separated from the Alpha channel with its RGB for reasons of file size, usually for mobile applications.
For more info about the usefulness of splitting the alpha and rgb channels of a texture I will discuss in the next article from the link below.
Well let's start here I have two solutions to solve the above problem, both using Code from GitHub which I will explain from how to get it and installation.
Alright first let me teach you how to get the script
First Code is USplitAlpha from Minh Ha
Please click this link to go to the USplitAlpha github Github - USplitAlpha
If you have opened the link above like the picture above, please look for the green button that says Code(Box1), click it until it looks like the display above (box2) then you Download ZIP(Box3).
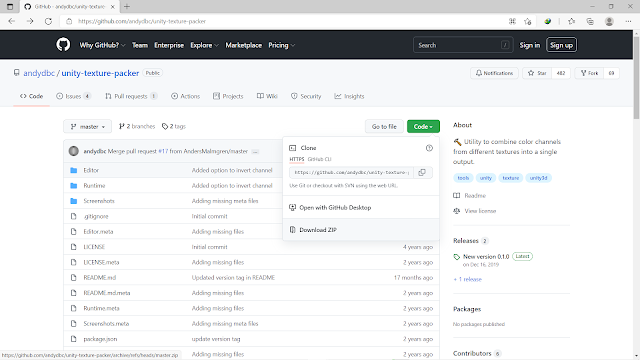
Just like the first code, the second code from Andy Duboc, namely unity-texture-packer, you can get it using the same way as the first code via the URL below
by clicking the URL > search for code > Download Zip
Alright, now that we have the two codes above, it's time for us to install it into our Unity Project. Here I am creating an example project in which there is a 3D object, namely a plane.
Now we are looking for where the Downloaded Code is and extract it then
put or drag the two folders directly into Unity Assets, wait a moment if on the console there is a yellow warning (warning) just ignore it, it will not affect the performance of the code we input
Now we check whether the installation process was successful by clicking on the window on the top left (Box1) you can see there is a Simple Sprite Packer(Box2) meaning the first Code UsplitAlpha was successfully installed then if you see channel packer(Box3) it means the second Code is unity-texture-packer successfully installed.
Alright, now the two codes that we have can work, then I will teach you how to use the code, starting with the first one, that is
- UsplitAlpha
This code has many uses, not only can combine an Alpha channel but can also separate them for other uses. This code can also create simple Sprite Sheets.
How to use this Code to combine Alpha Channels is very easy, first you need to create a new material by Right Click -> Create -> Material
Next we select the material and change the Shader(box1) to SplitAlpha(box2) then click Sprite and select Default.
Material -> Shader -> SplitAlpha -> Sprites ->Default (box1)
Next we add the material that we created into the plane property, next in our material drag our RGB texture to the Sprite Texture (box1) the result will be like the image below (box2)
Next we drag our Alpha texture to External Alpha material (box1) you can see the results of merging the RBG and Alpha textures to be like the image below (Box2).
If your RGB texture has a transparent color, it will be like the image above (Box2) to be Transparent.
Alright, those are the tips from the first code, then we go to the second code, namely
- unity-texture-packer
Different from the first code where the process of merging Alpha and RGB textures requires Material and Shader Code, this code does not require both. The processed textures will be automatically converted and exported into pictorial formats such as JPG, PNG and EXR,
maybe you are still confused by my explanation, let's just start this second Tutorial Code.
First, let's open the tool to combine the textures by clicking window(Box1) on the top left and then we click Channel Packer(Box2) so that a new window appears as shown above(Box3). Next below the input there is a plus sign(box4) we click 2 times so that it becomes like the display below.
Then we input in the select box in the first slot is RGB Texture(Box1)
Slot 2 we input Texture Alpha(Box2)
For the first slot Texture RGB(Box1) we check Channel Selection red > red; blue > blue; green > green while we just leave alpha blank(Box3).
For the second slot Alpha texture(Box2) We change RGB to all alpha(Box4) and leave it alpha as shown above.
If you have set it like the picture above then we just need to scroll down a little so that Option(Box1) looks like the image below
We select the format that will be generated and also the resolution (box2) then we click Generate texture after that it will appear in the file explorer that we choose we will save where the texture of our Alpha and RGB merges (Box3)
Okay, the above is the merged image, unlike the first code, which may be more manual, this second code only needs one setting and you can use it for other similar textures, which have alpha and rgb.
Alright, that's it for my tutorial this time, if you have any questions, please comment below, thank you for reading my article, see you in the next article.


0 Komentar